
By Joel Middleton, UK,
Airfix, 1/72
Hello and Intro
Having seen the beautiful builds already featured by Arcus Hobby Color, I was honoured to be asked to share next, this was the first build I used Arcus paints on and the way they performed made me a real fan!
About the Prototype
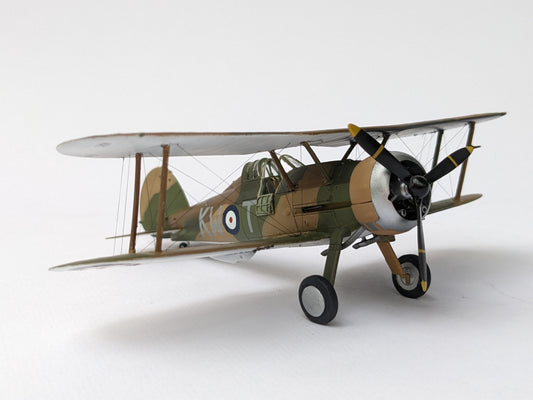
The Gloster Gladiator was the last bi-plane made for the British Royal Air Force and although representing the pinacle of bi-plane design being capable of over 250mph (400kph), it was introduced in the same year as the Messerschmit BF-109 so was obsolete as soon as it entered service, dispite this it served all around the world successfully during the Second World War and actually served as a training aircraft into the 1950s with the Portuguese Airforce.
It was developed from the Gloster Gauntlet using the Bristol Mercury radial engine and improved aerodynamics.
As well as being used by the Royal Air Force and the Royal Navy, it was exported extensively, to countries including China, Belgium, Finland, Latvia, Lithuania and Ireland.
The first confirmed kill by a Gladiator was on the 24th of February 1938 when Chinese Air Force Captain John Wong Sun-Shui, shot down a Mitsubishi A5M Claude of the Japanese Navy near Nanjing.
By the start of the Second World War the Gladiator was outclassed by most opposition, but it was key in various theators including Finland, Iraq, Syria, Greece and North Africa. During the defence of Malta, the small number of Royal Air Force Gladiators were mythologised as "Faith, Hope and Charity".
The final confirmed kill was almost exactly 5 years after the first on the 15th of February by 1st Lt Håkan Strömberg of the Finish Air force who destroyed a Soviet Polikarpov R-5.
The Model
I used the 1/72 Airfix Gloster Gladiator which was originally tooled in 2013 and is one of the new generation of Airfix kits with good engineering and nice detail. Be careful if you want one, because they also have an older kit which is not very good!
The boxing I used was the 2019 release with Royal Air Force and Belgian Air Force schemes both from early 1940 in North West Europe.

I also used the SBS models interior photo etch set which is remarkable, it completely replaces the kit cockpit (except the floor and control column) with stunning detail and was surprisingly easy to make.
Building the Model
The modern Airfix plastic is really nice and almost snaps together, there were a number of really clever design features including sprue which holds the wing struts in the right location until you have everything glued, at which point you cut the sprue out.
In the cockpit, the SBS detail set went to together using thin CA glue applied with a piece of stretched sprue to provide accurate application. The cockpit is a combination of aluminium paint, RAF Interior Grey Green. The Grey Green was my first experience of Arcus Hobby Colour paints and it went down beautifully and was really forgiving.


Once it was painted, I used a cocktail stick to chip away the green in high traffic area to show the lacquer based silver paint underneath.
Once it had been left for a few days to cure, I used washes made from thinned oil paint to simulate grime and provide a little depth.
The Instrument Panel was painted the same way with Extra Dark Sea Grey over a lacquer based silver.
Once the cockpit was assembled and painted, the rest of the build was very simple, I cut out the access door to provide a better view of the cockpit but other than that it was straight out of the box.
The seams were almost invisible just from being glued together and the ribbed fabric surface texture made the remaining clean up very simple. I simply used Mr Surfacer 1000 sprayed along the seam and then sanded with a slightly flexible sanding stick.
Because I am clumsy, I ended up snapping off the gun barrels from the wings so drilled them out and replaced them with 3D printed replacements.

Painting the Model
I chose the RAF scheme which is quite complex with lighter colours on the lower wings and the lower surfaces which means that I needed all of the paints from the RAF WW2 Trainer Aircraft set, even the yellow got used on the propellers! I also needed the white and black for the identification markings on the bottom.

The painting itself was very simple with no attempts at shading, the only complicated thing was all of the masking!
Because the Arcus enamels go down so smoothly, I laid the decals down over the paint without using a gloss coat.
I again used a wash made from thinned oil paint to accent the panel lines, with a brown used on the camouflage surfaces and medium grey used for the black/white undersides.
Once those were all done, I added rigging wires using Uschi elastic rigging line, as with the photo etch earlier in the build I used thin CA glue applied using a Stretched Sprue. The final touch was gluing on the new gun barrels and the wheels.
Thank you so much for letting me share this!
The Result